At last the real pakesizzer, my grandson Taeke (3), took the helm of the Pakesizzer while his father was rowing. A memorable moment. The wind was to gusty to go sailing with him.
Apologies for the fender hanging out...
 Last two days with winds of Bft 4+ were not suited for the maiden voyage.
This morning there was almost no wind at all. Time to put the Pakesizzer in the water for the first time.
As it was the Maiden Voyage it was appropriate that my wife had the honor of a first row.
The rowing was very light and quick responding.
After that we set the sail but due to the very light wind we could not really test the sailing capabilities.
Last two days with winds of Bft 4+ were not suited for the maiden voyage.
This morning there was almost no wind at all. Time to put the Pakesizzer in the water for the first time.
As it was the Maiden Voyage it was appropriate that my wife had the honor of a first row.
The rowing was very light and quick responding.
After that we set the sail but due to the very light wind we could not really test the sailing capabilities.
 It was not possible to use the side benches. Assumingly the Peapod needs more wind for stable sailing.
Due to bad planning there are no sailing pictures. Yours truly ran out of battery power for the camera :-(
Later in the day the builder took to the oars for the heavy load test. He survived.
It was not possible to use the side benches. Assumingly the Peapod needs more wind for stable sailing.
Due to bad planning there are no sailing pictures. Yours truly ran out of battery power for the camera :-(
Later in the day the builder took to the oars for the heavy load test. He survived.
 We went up north for a couple of days. So time to start rigging the Pakesizzer.
The weather was sunny so the boat was moved outside.
First thing to do was stepping the mast.
The mast fitted OK and the cleats that I had made back home out of oak could be fitted on the mast for the halyard and on the frontdeck for the downhaul.
Next step was to seize and lace the sail to the boom and yard. My wife was very helpful in tying the various knots.
We went up north for a couple of days. So time to start rigging the Pakesizzer.
The weather was sunny so the boat was moved outside.
First thing to do was stepping the mast.
The mast fitted OK and the cleats that I had made back home out of oak could be fitted on the mast for the halyard and on the frontdeck for the downhaul.
Next step was to seize and lace the sail to the boom and yard. My wife was very helpful in tying the various knots.
 I am not a good knot maker. Thick fingers and lack of coordination I presume.
After a bit of experimenting with the exact location of the halyard on the yard the sail could be set.
The present downhaul is not thick enough so in the near future a larger diameter line will be used.
The planned maiden sail was cancelled due to the wind of 7 m/s (14 knots). Sailable weather but not for a shakedown sail.
Forecast for tomorrow is not much better but wait and see. It is anyhow nice to look at the boat you have built. Pretty as a picture....
I am not a good knot maker. Thick fingers and lack of coordination I presume.
After a bit of experimenting with the exact location of the halyard on the yard the sail could be set.
The present downhaul is not thick enough so in the near future a larger diameter line will be used.
The planned maiden sail was cancelled due to the wind of 7 m/s (14 knots). Sailable weather but not for a shakedown sail.
Forecast for tomorrow is not much better but wait and see. It is anyhow nice to look at the boat you have built. Pretty as a picture....
A week ago I was up North to bring the spars. The mast did not really fit in the car and had to stick a little bit out of the front passenger window.
A police car stopped me but the top was not sticking out beyond the mirror so I could go ahead. Lucky me....
This weekend my wife and I were up North. Good friends from South Africa were visiting what was more important than working on the Peapod.
We did a test fit of the mast. Due to several layers of epoxy and PU varnish on the hole in the front seat and on the mast it was a mis fit.
 The corrective action was to increase the hole with a rasp.
After several tries the mast did fit through the mast hole but the dowel in the heel of the mast did not yet fit into the mast step.
Later I did also remove some wood from the dowel but could not do a test fit anymore due to the rain.
The corrective action was to increase the hole with a rasp.
After several tries the mast did fit through the mast hole but the dowel in the heel of the mast did not yet fit into the mast step.
Later I did also remove some wood from the dowel but could not do a test fit anymore due to the rain.
 What could be done was fitting a copper rubbing strip on the keel.
Also I fitted a swivel block on the keel for the sheet and put epoxy primer on the rasped mast hole.
Next time maybe it is possible to have the first sail although the inside of the boat still needs a final coat of satin gloss PU varnish.
The weather has been far from ideal the last week. Around freezing point and strong winds fro m the east. That weather will continue for the coming days. You almost want to have global warming this way.
The third layer of the mast is glued at last and I cut the corners of mast on the table saw with the blade at a 45 deg angle.
After cutting the mast as far as possible to a 58 mm square I started to drill a few holes to make room for the halyard sheave. It is better to do it now before the mast is round.
I have the feeling the sheave I bought ages ago is a bit large but that's what I have so that's what I will use.
I also made the jaws for the boom that will go around the mast. As I had no white pine left I used larch. The grain looks quite straight and just let's hope it is not to brittle.
Now a lot of planing with a hand plane to get mast and yard round.
Next is sanding using an inversed sanding belt from my stationary band sander.
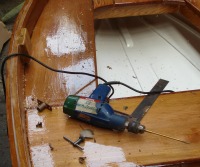
 The off topic motor hatch is almost ready.
I filled the groves with blackened epoxy. The epoxy was a bit thick viscous so not all groves are filled to the same level.
After a lot of sanding the hatch looks nice from a distance.
Eastern will be spend up North. Usually my Pilot will go into the water at the Friday before Eastern. Looking at the weather that will be a few days later. No sense to start the season with frozen water valves.
The off topic motor hatch is almost ready.
I filled the groves with blackened epoxy. The epoxy was a bit thick viscous so not all groves are filled to the same level.
After a lot of sanding the hatch looks nice from a distance.
Eastern will be spend up North. Usually my Pilot will go into the water at the Friday before Eastern. Looking at the weather that will be a few days later. No sense to start the season with frozen water valves.
Last Sunday our grandchildren went back home. It were 9 very nice days with them but during that period I did not work on the Peapod. Also the weather was not very good at around freezing point to do some gluing.
At last I ripped the white pine into the necessary a bit oversized strips to glue the mast, boom and yard.
 Just before I wanted to glue the yard from two pieces I noticed it was a bit shortish. Luckily I remeasured before I put on any glue and compared it to the drawings. In the end it was 40 cm short. After some more checking I concluded that I made a translation error from Imperial to Metric. Maybe next time I should buy an Imperial tape ruler and not translate measurements anymore...
Luckily I stiil had the piece I cut from the yard to make it the wrong length. With two butt joints I think I have safely solved the issue.
After gluing the yard I trimmed the sides on the table saw. Next I made a 38 mm cirkel with a compass. On the table saw with the blade at 45 degr. I cut all sides to this cirkel what resulted in a 8 sided yard. Next step will be a plane and some elbow grease to get it near round.
The boom is also glued from two pieces to get the thickness. As the boow will remain square I only need to cut the boom to the right size and round of the edges on the rouiter table.
Just before I wanted to glue the yard from two pieces I noticed it was a bit shortish. Luckily I remeasured before I put on any glue and compared it to the drawings. In the end it was 40 cm short. After some more checking I concluded that I made a translation error from Imperial to Metric. Maybe next time I should buy an Imperial tape ruler and not translate measurements anymore...
Luckily I stiil had the piece I cut from the yard to make it the wrong length. With two butt joints I think I have safely solved the issue.
After gluing the yard I trimmed the sides on the table saw. Next I made a 38 mm cirkel with a compass. On the table saw with the blade at 45 degr. I cut all sides to this cirkel what resulted in a 8 sided yard. Next step will be a plane and some elbow grease to get it near round.
The boom is also glued from two pieces to get the thickness. As the boow will remain square I only need to cut the boom to the right size and round of the edges on the rouiter table.
 The first two pieces of the mast are glued today. The temperature of around 5 degr C together with the electric heater and using the low temp harder made that possible.
I did not glue all three layers in one go as this is a slippery operation and I have better control with only two layers. As always: You cannot have enough clamps.
A short update on the off topic motor hatch. I used the router to make a grove in the short sides of the teak.
After that I started filling the groves with blackened epoxy. This again is a somewhat messy operation. As I have to sand at least 1 mm from the teak to make it flush it should not be a problem.
I did miscalculate the amount of epoxy needed so I ran out of supply after half the groves done. An order for extra supplies is sent out right away. With a bit of luck I can continue on Saturday. Temperature permitting of course. Spring is not there yet!
The first two pieces of the mast are glued today. The temperature of around 5 degr C together with the electric heater and using the low temp harder made that possible.
I did not glue all three layers in one go as this is a slippery operation and I have better control with only two layers. As always: You cannot have enough clamps.
A short update on the off topic motor hatch. I used the router to make a grove in the short sides of the teak.
After that I started filling the groves with blackened epoxy. This again is a somewhat messy operation. As I have to sand at least 1 mm from the teak to make it flush it should not be a problem.
I did miscalculate the amount of epoxy needed so I ran out of supply after half the groves done. An order for extra supplies is sent out right away. With a bit of luck I can continue on Saturday. Temperature permitting of course. Spring is not there yet!
As temperatures are rising around here it was time again to do some gluing after I bought some lower temperature harder for the epoxy.
Priority project is the restoring of the teak deck on the motor hatch of my ONJ Pilot. After 12 years of abuse water has entered the plywood on which the teak was set. Also this hatch was not strong enough and was flexing a bit when standing on it. As my motoring season starts around Eastern something had to be done.
First I "dismantled" the construction. Demolition is another word for the same action.
The plywood base was only 10 mm so no wonder it flexed. I was unable to get the 4 mm thick teak strips of the ply without some damage so I decided to buy new teak decking material.
My lumber yard for special woods does not sell 4 mm teak strips but 9.8 mm thick with a grove at both sides to form a T. This way you can lay the teak butted and optically still have a grove between the strips. When I had to pay for the teak I realized teak is not a cheap wood......
I have now reglued the sides and glued in a 15 mm plywood sheet. To get that in and to accomodate the thicker teak I routed a deeper ridge in the sides.
The coming days I will glue in the teak strips and fill the seams with blackened epoxy. Although my epoxy supplier is not over enthousiastic about the idea I prefer that option over the use of bedding compound. In my opinion the move in this size of teak is minimal. We will see in the future.
Today I went again to my wood supplier to buy spar stock. In the end I decided not to buy Oregon Pine but to get Yellow Pine ("Amerikaans Grenen").
I bought board of 20 x 190 mm and resp. 3400 and 2700 mm length. This compensates a bit the price of the teak.....
The long stock will be ripped the coming days to get three layers of 60 mm wide planks that will be glued together to get the 600 x 600 basis from which to make the spar.
The shorter plank will be enough to make the boom and yard. Work for the coming days. As of coming Friday our two grandchildren will stay for a week so progress will be limited.
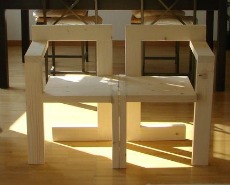
As I can not do much on the Peapod at the moment I have started to make another piece of furniture from the Rietveld book I mentioned in an earlier blog entry.
This time it is the "Steltman chair", designed for the interior of a jeweller's shop in the Hague in 1963. It is just a test model made from some left over larch.
The picture is not very good because it is made with my IPad against the light.
This is the real chair as it should be.
The design includes some mortise and tennons joints. As I have bought a cheap (FERM) biscuit jointer I decided to use this tool for several joints.
Due to these joints it is not the easiest project but it is fun.
If the end result is acceptable I intend to built a left and right handed pair in pine.
For various reasons my wife did not go up North last weekend but this weekend she did. As did our grandchildren and their parents to skate. Already tomorrow the temperature will be above zero so today was their last chance.
Of course I was so kind to stay home for the dogs.
My wife did a test fitting of the knee laminates and mailed me a picture of the result.
Not to bad.
When she is back I can cut the knees to the required length and coat them in epoxy for the final fitting in the near future.
Just to keep you posted that some progress is made. :-)
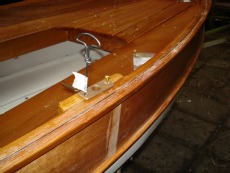
I forgot to put the thwart knees on the to do list in the previous post. These knees give extra strength to the sheer near the oar locks.
In his building manual Arch Davis suggests to steam bend the thwart knees. As I have no steam box I tried to boil a piece of oak and bend it around the mold I made. As to be expected the oak broke during bending.
 As I did not want to build a steam box just for two knees I decided to laminate them. For the lamination's I ripped 2.5 cm wide strips from some left over 4 mm plywood that was used for the hull.
Arch indicates for steaming a piece of 5/8'' (16 mm) that would imply 4 lamination's but I decided to make it 5. Not for strength but I want to conceal the screw with a bung so I want to have little bit more flesh.
As temperatures were around zero I could not use my epoxy so I have used waterproof water glue that cures at 5 C and is far less messy so I could bring it to the home from the shop after gluing to cure. Will be interesting to see whether it holds.
After gluing I did some sanding on my old stationary sander to make it look better. It is not ready yet because first the knees have to be checked on the Peapod for accuracy and to establish the final length and the location of the screw holes.
As I did not want to build a steam box just for two knees I decided to laminate them. For the lamination's I ripped 2.5 cm wide strips from some left over 4 mm plywood that was used for the hull.
Arch indicates for steaming a piece of 5/8'' (16 mm) that would imply 4 lamination's but I decided to make it 5. Not for strength but I want to conceal the screw with a bung so I want to have little bit more flesh.
As temperatures were around zero I could not use my epoxy so I have used waterproof water glue that cures at 5 C and is far less messy so I could bring it to the home from the shop after gluing to cure. Will be interesting to see whether it holds.
After gluing I did some sanding on my old stationary sander to make it look better. It is not ready yet because first the knees have to be checked on the Peapod for accuracy and to establish the final length and the location of the screw holes.
 As it is freezing and snowing in NL my wife will get up North for the weekend with to our place there with our grandchildren and their parents to skate. She can do the test fitting and scribe the correct dimensions. I will stay home with the dogs.


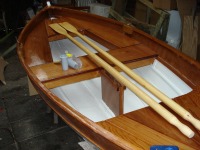
 Time to hang the rudder.
 After that the hanging of the rudder itself was relatively easy.
 Back home I continued with the spars.


 The New Year did start well with a trip up North for a few days. A lot of work to do in the garden but also my plan was to get the oarlocks in.