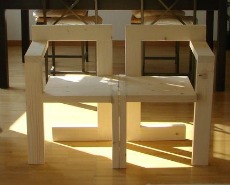
As I can not do much on the Peapod at the moment I have started to make another piece of furniture from the Rietveld book I mentioned in an earlier blog entry.
This time it is the "Steltman chair", designed for the interior of a jeweller's shop in the Hague in 1963. It is just a test model made from some left over larch.
The picture is not very good because it is made with my IPad against the light.
This is the real chair as it should be.
The design includes some mortise and tennons joints. As I have bought a cheap (FERM) biscuit jointer I decided to use this tool for several joints.
Due to these joints it is not the easiest project but it is fun.
If the end result is acceptable I intend to built a left and right handed pair in pine.
For various reasons my wife did not go up North last weekend but this weekend she did. As did our grandchildren and their parents to skate. Already tomorrow the temperature will be above zero so today was their last chance.
Of course I was so kind to stay home for the dogs.
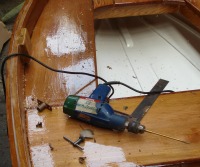
My wife did a test fitting of the knee laminates and mailed me a picture of the result.
Not to bad.
When she is back I can cut the knees to the required length and coat them in epoxy for the final fitting in the near future.
Just to keep you posted that some progress is made. :-)
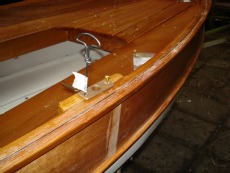
I forgot to put the thwart knees on the to do list in the previous post. These knees give extra strength to the sheer near the oar locks.
In his building manual Arch Davis suggests to steam bend the thwart knees. As I have no steam box I tried to boil a piece of oak and bend it around the mold I made. As to be expected the oak broke during bending.
 As I did not want to build a steam box just for two knees I decided to laminate them. For the lamination's I ripped 2.5 cm wide strips from some left over 4 mm plywood that was used for the hull.
Arch indicates for steaming a piece of 5/8'' (16 mm) that would imply 4 lamination's but I decided to make it 5. Not for strength but I want to conceal the screw with a bung so I want to have little bit more flesh.
As temperatures were around zero I could not use my epoxy so I have used waterproof water glue that cures at 5 C and is far less messy so I could bring it to the home from the shop after gluing to cure. Will be interesting to see whether it holds.
After gluing I did some sanding on my old stationary sander to make it look better. It is not ready yet because first the knees have to be checked on the Peapod for accuracy and to establish the final length and the location of the screw holes.
As I did not want to build a steam box just for two knees I decided to laminate them. For the lamination's I ripped 2.5 cm wide strips from some left over 4 mm plywood that was used for the hull.
Arch indicates for steaming a piece of 5/8'' (16 mm) that would imply 4 lamination's but I decided to make it 5. Not for strength but I want to conceal the screw with a bung so I want to have little bit more flesh.
As temperatures were around zero I could not use my epoxy so I have used waterproof water glue that cures at 5 C and is far less messy so I could bring it to the home from the shop after gluing to cure. Will be interesting to see whether it holds.
After gluing I did some sanding on my old stationary sander to make it look better. It is not ready yet because first the knees have to be checked on the Peapod for accuracy and to establish the final length and the location of the screw holes.
 As it is freezing and snowing in NL my wife will get up North for the weekend with to our place there with our grandchildren and their parents to skate. She can do the test fitting and scribe the correct dimensions. I will stay home with the dogs.