Although other things consume more time than anticipated I managed to bevel the keel today.
The garboard stringers also needed attention as they not always lay nicely on the molds.
The masking tape is on for easier removal of epoxy squeeze out.
Next step will be marking the first plank (although calling a piece of plywood a plank....) but that will be at the end of the week.
 This morning the epoxy for the stringers was nicely cured. As now the backbone is stable I could remove the ends of the strongback to be able put on the seat risers. Removing the ends was a little more work than anticipated as I could not reach most screws anymore with the cordless as stringers were now somewhat blocking access. So back to the old manual gear to get them out.
 Next step was getting the seat risers on. Learning from the advice of Arch I planed them down a bit more. After that they went on well. Just a little shortcut while sawing one end gave a less than perfect fit but nothing that epoxy could not fix. Lesson again not to make shortcuts.....
Again the heater on for curing.
The coming days I have some other things to attend to but will try to start with bevelling the keel and the garboard stringers to accept the first plank.
Start looking like a boat isn't it?
Next step was getting the seat risers on. Learning from the advice of Arch I planed them down a bit more. After that they went on well. Just a little shortcut while sawing one end gave a less than perfect fit but nothing that epoxy could not fix. Lesson again not to make shortcuts.....
Again the heater on for curing.
The coming days I have some other things to attend to but will try to start with bevelling the keel and the garboard stringers to accept the first plank.
Start looking like a boat isn't it?
As I was a little low due to my stringer problem I decided to send an email to Arch Davis to ask his advise. Considering the difference in time zone and the fact it was in the weekend he answered very quickly. Arch had no experience with red cedar for this application but he advised me amongst others to plane the stringers down 2 mm to make bending easier and not to twist the stringers completely and accept that the stringers will need some fairing and bevelling before planking.
 I also looked in back issues of WoodenBoat for articles on the subject. There was one in WB 129, page 99 (1996) on bending wood with dry heat. So I also applied a heatgun (paint stripper) to help the bending and twisting.
In the end I was able to get the garboard stringers on. Not 100% neat but sufficient to be workable.
I also looked in back issues of WoodenBoat for articles on the subject. There was one in WB 129, page 99 (1996) on bending wood with dry heat. So I also applied a heatgun (paint stripper) to help the bending and twisting.
In the end I was able to get the garboard stringers on. Not 100% neat but sufficient to be workable.
 Next thing to do was gluing the stringers and sheers to the stems with epoxy. As the ambient temperature is 4 centigrade at the moment I had to use my electric heater to get temperature sufficent high for curing. Nice messy job.
I had to unscrew every stringer end, put epoxy on it and screw it back on. In the end my cordless drill/screwdriver is now epoxy coated.
If the epoxy is sufficiently cured tomorrow I will remove the front and end pieces of the strongback to be able to get the seatrisers on. As they are not very curved I don't expect any problems but you never know......
Next thing to do was gluing the stringers and sheers to the stems with epoxy. As the ambient temperature is 4 centigrade at the moment I had to use my electric heater to get temperature sufficent high for curing. Nice messy job.
I had to unscrew every stringer end, put epoxy on it and screw it back on. In the end my cordless drill/screwdriver is now epoxy coated.
If the epoxy is sufficiently cured tomorrow I will remove the front and end pieces of the strongback to be able to get the seatrisers on. As they are not very curved I don't expect any problems but you never know......
Today I managed to get most stringers fixed on the molds. "Most" implies of course "not all". The garboard stringer proves to be the hardest although also on others bending sometimes resulted in splitting or cracking. Most of the time the stringer had enough length ot try once more. The last garboard stringer had to be remade. Apparently red cedar has some bending problems. Another reason can be that the ambient humidity is low at the moment. Tomorrow I will give it another try using hot towels to facilitate bending. Keep you posted!
My objective to put all stringers and sheers on the molds was over ambitious.
Of course there were again other priorities like going to the gym and getting a haircut. But also the red cedar wanted to show it was "living material". When I put the first sheer on the molds I saw a minimal irregularity in the wood. Nothing to panic until I bent it very slowly to the stem and just at the end it broke.
Consequently I had again to rip a board and plane it to the right thickness.
This time the sheer could be fastened to the molds in the right way.
That was not yet the end of the misery. I had screwed the second sheer to the first stem and wanted to prepare the it for the second stem. But alas, there was a lot of tension on the sheer and one of the clamps fell of resulting in a chain reaction at the other clamps. The first screw could not hold this "explosion" and the sheer did split at that point. Back to the old saw and plainer to make again another sheer.
Luckily that was the end of the disaster. The second sheer went on well.
 To continue I first had to round two corners of the stringers on the routertable. Some manual sanding gave the finishing touch.
 To finish I just clamped the first stringer on the molds and called it the day.
Not much progress the last two days. Other priorities.
 Worked a bit on a side project. Had to laminate some mahogany and red cedar resulting in the normal epoxy mess. Outside it is between zero and 6 degrees C. Maybe slightly higher in my shed. So I had to bring it inside the house to cure. Maybe I should buy a hardener that cures at lower temperature.
I was planning to put the stringers and sheerstrake on the molds but had an itchy feeling about it so I checked the drawings and luckily found a mistake.
As mentioned in an earlier blog entry I had ripped the sheerstrake under an angle. Mistake! The angle is needed on the rubrails (outside of the planking) but not on the sheerstrake (inside of the planking). Just in time. So now I had to rip another board and plane it to the right thickness.
Present planning is to put the sheers and stringers on the molds tomorrow. Let's hope there are no more surprises.
Worked a bit on a side project. Had to laminate some mahogany and red cedar resulting in the normal epoxy mess. Outside it is between zero and 6 degrees C. Maybe slightly higher in my shed. So I had to bring it inside the house to cure. Maybe I should buy a hardener that cures at lower temperature.
I was planning to put the stringers and sheerstrake on the molds but had an itchy feeling about it so I checked the drawings and luckily found a mistake.
As mentioned in an earlier blog entry I had ripped the sheerstrake under an angle. Mistake! The angle is needed on the rubrails (outside of the planking) but not on the sheerstrake (inside of the planking). Just in time. So now I had to rip another board and plane it to the right thickness.
Present planning is to put the sheers and stringers on the molds tomorrow. Let's hope there are no more surprises.
Today is my birthday. Yesterday my daughters plus their husbands / boyfriend came for a surprise dinner. Also their gift, a very nice bench vise was much appreciated.
Not much work done today. First planed down one board from 20 to 16 mm.
Next I ripped this board under an angle for the sheer and straight for the stringers.
Bit difficult to handle the 4 meter board on my own.
I clamped one stringer to the backbone what was rather more difficult than expected. Maybe western red cedar does not bend that well.
Tomorrow is an other day. Let's party.
Yesterday I continued with cleaning, marking and bevelling both stems.
First of course I did cut the plugs flush and removed the rest of the epoxy stains.
Marking is a precise proces. Especially the flip side where you have to copy from the other side. In the end the result was not too bad.
Next step was to put a stem in the bench vise and start cutting with the block plane. A nice and satisfying job. Of course after planing remarking various lines is necessary.
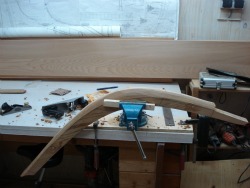
Afterwards I did rip a long board on the table saw to get the keel. Arch specifies 3/4''(= 19 mm) and my western red cedar board is 20 mm. I did not bother with that 1 mm difference. It is within my own accuracy. Handling a 4+ meter long board on my own was a bit tricky to keep the board fixed against the straight edge of the tablesaw.
 This job was done al fresco as you cannot rip a 4 meter board in a 4.75 meter shed.
I put afterwards the blade of the table saw to a 11 degree angle to cut a preliminary bevel. It was a bit experimenting to get the cut ending near the middle of the keel. As you can see I stayed a bit on the safe side.
This job was done al fresco as you cannot rip a 4 meter board in a 4.75 meter shed.
I put afterwards the blade of the table saw to a 11 degree angle to cut a preliminary bevel. It was a bit experimenting to get the cut ending near the middle of the keel. As you can see I stayed a bit on the safe side.
 Finally I put both stems and the keel on the strongback and screwed them together. I also put screws through the cleats on the molds into the keel for a good fixed positioning. These last screws are of course temporarily.
Next step is to rip the stringers, seat risers and sheerstrakes. These longitudinals are specified with a thickness of 5/8'' (= 16 mm) so I will have to plane the stock to that dimension. No cutting corners here. As my portable planer is somewhere else I cannot continue before Monday next. I will use part of the time in between to clean out the mess in my shed. Although the Maine Peapod is a small boat, it takes up a lot of space in a small shed.....
Finally I put both stems and the keel on the strongback and screwed them together. I also put screws through the cleats on the molds into the keel for a good fixed positioning. These last screws are of course temporarily.
Next step is to rip the stringers, seat risers and sheerstrakes. These longitudinals are specified with a thickness of 5/8'' (= 16 mm) so I will have to plane the stock to that dimension. No cutting corners here. As my portable planer is somewhere else I cannot continue before Monday next. I will use part of the time in between to clean out the mess in my shed. Although the Maine Peapod is a small boat, it takes up a lot of space in a small shed.....
Before my grandson arrived I tried to flush trim both stems on the router table. I was not satisfied with the result so I stopped and decided to do further trimming manually with a spokeshave and a blockplane.
 In the mean time grandson Taeke came looking what his granddad was doing but shifted attention when grandma came with cookies.
 For right positioning while gluing I had put screws through the stem halves. As I had put these screws were they could be visible after bevelling (case of doing before thinking) I decided to plug the screw holes so I cut some plugs on my drillpress and glued them in the holes.
 Tomorrow after curing we will see if we can make a nice flat surface. The following step will be to mark the stems for bevelling and alligning.
Today I went to Enkhuizen to the Klassieke Schepen Beurs (Classic Boat Show).
On the opening day there was already a nice crowd. Promising for the weekend!
 Of course I visited the traditional smoked herring booth. Delicious!
 An example of a traditional Dutch yacht at the show.
I also drove by PolyService, the epoxy shop in Amsterdam to get a few tins of the stuff. Back home I couldn't wait to glue both stems together.
We are blessed at the moment with relative high temparatures so the curing temperature of 15 Centigrade will not be to much of a problem. That will change the coming week I expect.
This weekend my first grandson is visiting so not much progress on the Peapod.
An example of a traditional Dutch yacht at the show.
I also drove by PolyService, the epoxy shop in Amsterdam to get a few tins of the stuff. Back home I couldn't wait to glue both stems together.
We are blessed at the moment with relative high temparatures so the curing temperature of 15 Centigrade will not be to much of a problem. That will change the coming week I expect.
This weekend my first grandson is visiting so not much progress on the Peapod.
Today I tried to construct a router table. Not a very fancy one but at least one to flush trim the stems. Issue with a router table is always the way to adjust the height of the router bit. My router is a cheap one and the movement of the base to adjust the height is not easy and that is an understatement. As a fancy heightadjustmentmechanism ( triple score with Scrabble?) is not an option I did it the crude way with a piece of wood clamped below the router and some blocks between to get to the right height. Good enough for the flush trim.
For rounding the sheerstrakes in the future I will have to make some adjustments.
Looking forward to the Classic Boat show tomorrow.
Today I cut the first piece of western red cedar with my jigsaw. All four stems that were pricked out yesterday came out nice. My shed was filled with the smell of cedar. And of course a lot of fine wood dust that I put into as glass jar for future use as a color filler for epoxy.
Four stems with a double ender? Yes, that is correct. Both the forward and the aft stem are made of two pieces of 20 mm glued together to get a 40 mm stem. One of each I cut out as accurate as possible.
The other half will be made to the right shape on the router table after they are glued together with epoxy. The only slight problem is that I have a router but not a router table so I will try to construct one. Nice job for tomorrow.
Friday I will go to the Dutch Classic Boat show in Enkhuizen and on the way back I will get a few tins of epoxy in Amsterdam.
One of the stem halfs I put on the jig just for fun. Start to look like something isn't?
This morning I went to the "Arnhemse Fijnhouthandel" (Arnhem Specialty Woods) to get the solid wood and ply for the Peapod. Just an hour driving from my home.
AF staffmember Ton Hendrikx was very helpfull in finding the right pieces of 20 mm Western Red Cedar. I bought 2 pieces 252 x 4250 mm and 3 pieces of 292 x 3650 mm. These are all net dimensions. Later I will need some extra wood for thwarts, seats and seatbeams but for the moment this was enough monetary outlay and weight to transport on the roof of my car. I also bought 3 sheets of best quality 4 mm Okoume ply which were cut in smaller width as per my specification. Let's hope I specified right....
It was a puzzle to get the wood in my shed. To finalize the working day I pricked out the fwd and aft stem on the wood and will cut them tomorrow with the jigsaw.
.