Today I went up to the North for one day to get some stuff for the new house and to do some work on the boat.
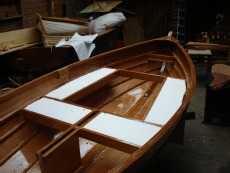
I did make the bottom pieces for the flotation chambers from 3 mm normal ply. Not the marine version. Do not think that is necessary.
After quite some adjusting they did fit reasonably well. You cannot get a very tight fit because you would not be able to get them in. At least I couldn't.
 The flotation bottoms are not in Arch' drawings. While cutting the first piece of styrofoam I had noticed it was rather crumbly stuff. Also one of the Followers of this blog mailed me his experience with styrofoam flotaton material in Optimist sailing dinghies. So making the bottoms would be a solution.
I epoxied both sides of the bottoms. That should be sufficient but maybe I wil add another layer to be on the safe side.
Further plan was to sand the inside parts to be varnished like the sheerstrake and the seat beams. However it was relatively hot outside and the sun was sorcing the black roof of the shed so the working conditions were not good at all and I decided to call it a day and drive the 90 minutes back to the new house and take a nice bottle of chilled white wine with the missus.
Don't know when I am able to continue working on the Peapod.
The flotation bottoms are not in Arch' drawings. While cutting the first piece of styrofoam I had noticed it was rather crumbly stuff. Also one of the Followers of this blog mailed me his experience with styrofoam flotaton material in Optimist sailing dinghies. So making the bottoms would be a solution.
I epoxied both sides of the bottoms. That should be sufficient but maybe I wil add another layer to be on the safe side.
Further plan was to sand the inside parts to be varnished like the sheerstrake and the seat beams. However it was relatively hot outside and the sun was sorcing the black roof of the shed so the working conditions were not good at all and I decided to call it a day and drive the 90 minutes back to the new house and take a nice bottle of chilled white wine with the missus.
Don't know when I am able to continue working on the Peapod.
There is quite some wind blowing what causes little leafs to come in the shed and fall on my (not so very) beautiful paint job.
The correct corrective action is of course closing all holes with foam or some other substance.
The easier way that I used is to put up two garden umbrellas. It is too lousy weather to put them up outside anyway.
Now I put the second layer of polyurethane on. Looks already a bit better.
As I am running ut of the white stuff I closed the shop for this week
Next time I want to make the flotation bottoms and to put three layers of clear polyurethane varnish on the sheerstrake and seat beams.
Back at my shed for 3 days. Of course first the grass had to be cut.
 After that I did sand the inside of the boat that I wanted to paint. I decided that the sheerstrake, seat beams and daggerboard case would be varnished.
For both I use Polyservice DD lak. This is a polyurethane 2-components lacquer.
The painting part is done in off-white. After mixing the components it has to stay for 30 minutes. Almost like baking bread.
After that I did sand the inside of the boat that I wanted to paint. I decided that the sheerstrake, seat beams and daggerboard case would be varnished.
For both I use Polyservice DD lak. This is a polyurethane 2-components lacquer.
The painting part is done in off-white. After mixing the components it has to stay for 30 minutes. Almost like baking bread.
 I did the painting with a brush to be able to get at the difficult parts around the stems.
It is a bit back breaking excercise to get to the bottom of the boat.
Of course I had only mixed enough paint for 90 % of the job so remixing and 30 minutes waiting.......
I am not very satisfied with the results. It was difficult to get a good even spread of the thin paint and later I found the paint was "sacking" (combination of too much paint and gravity) at several spots what could not be corrected as the paint was already drying. Surely the outside will be done with a paint roller.
Tomorrow the second layer and next week maybe a third one. Wait and see.
I had planned to cut the ply "bottoms" for the flotation but found out I had left my jig saw at the new house. So enough time to do other things.
I did the painting with a brush to be able to get at the difficult parts around the stems.
It is a bit back breaking excercise to get to the bottom of the boat.
Of course I had only mixed enough paint for 90 % of the job so remixing and 30 minutes waiting.......
I am not very satisfied with the results. It was difficult to get a good even spread of the thin paint and later I found the paint was "sacking" (combination of too much paint and gravity) at several spots what could not be corrected as the paint was already drying. Surely the outside will be done with a paint roller.
Tomorrow the second layer and next week maybe a third one. Wait and see.
I had planned to cut the ply "bottoms" for the flotation but found out I had left my jig saw at the new house. So enough time to do other things.
Arrived back in the North Monday afternoon. Applied two layers of pure epoxy almost wet-on-wet or better formulated wet-on-sticky. Now these layers have to cure for 48 hours before fine (200+) sanding and putting on the paint or varnish.
 The seats also have to get at least a double layer of clear epoxy on the underside.
The top side will be done when the seats are screwed in and the screwholes are bunged.
Of course I have not been careful enough with epoxy so some dripping due to gravity to the other side of he seat. Nothing some scraping and sanding won't solve but extra work.
The seats also have to get at least a double layer of clear epoxy on the underside.
The top side will be done when the seats are screwed in and the screwholes are bunged.
Of course I have not been careful enough with epoxy so some dripping due to gravity to the other side of he seat. Nothing some scraping and sanding won't solve but extra work.
 I made some of the flotation from styrofoam insulation plates.
As this styrofoam is a bit brittle I don't like the exposed undersides. The styrofoam is just supported by cleats on the seat beams.
Maybe I will put a thin plywood underneath.
Of course more sealing of seat parts to do but I ran out of a good brush and mohair roller.
When doing a second layer " wet-on-sticky" it is quite difficult to see where you have been. Maybe it is therefore better to let it dry subsequently sand lightly to make it more visible.
I made some of the flotation from styrofoam insulation plates.
As this styrofoam is a bit brittle I don't like the exposed undersides. The styrofoam is just supported by cleats on the seat beams.
Maybe I will put a thin plywood underneath.
Of course more sealing of seat parts to do but I ran out of a good brush and mohair roller.
When doing a second layer " wet-on-sticky" it is quite difficult to see where you have been. Maybe it is therefore better to let it dry subsequently sand lightly to make it more visible.
This morning I put the flotation cleats in using screws. I did not glue them in as that is not necessary and with all those thin cleats can easily turn out in an epoxy mess.
I found out I was one cleat short. After some searching I found it laying on my workbench. As it was not yet in the impregnating epoxy I put that on and will screw it on just before I leave after lunch.
My shed is very hot inside. Black exterior walls and a black roof combined with sun makes it a great oven.
Continued next week.
My youngest daughter could pick up the epoxy, varnish and paint in Amsterdam so I am hopefully stocked for a few layers. I am not sure I have enough because I don't really know how much I will use :-)
 Last Friday we got the key for our new home so we went there for the weekend to start familarization. Now a few days back in the North for other things like boatbuilding.
I finalized the seats, sanded the inside of the boat and put on the first layer epoxy. Also the flotation cleats were epoxied.
Tomorrow morning I will put in the flotation cleats with screw and maybe give part of the seats their first coat of epoxy.
Tomorrow afternoon I am going back to the new house.
Perhaps coming Tuesday progress again. Plan is to put two additional layers of epoxy on the inside. The second layer can be applied when the the first is "sticky".
Next steps will be futher coating of the seats and cutting the flotation devices out of styrofoam.
When all epoxy is done it is time to put the paint and varnish inside.
Last Friday we got the key for our new home so we went there for the weekend to start familarization. Now a few days back in the North for other things like boatbuilding.
I finalized the seats, sanded the inside of the boat and put on the first layer epoxy. Also the flotation cleats were epoxied.
Tomorrow morning I will put in the flotation cleats with screw and maybe give part of the seats their first coat of epoxy.
Tomorrow afternoon I am going back to the new house.
Perhaps coming Tuesday progress again. Plan is to put two additional layers of epoxy on the inside. The second layer can be applied when the the first is "sticky".
Next steps will be futher coating of the seats and cutting the flotation devices out of styrofoam.
When all epoxy is done it is time to put the paint and varnish inside.


