Yesterday I went up North to do some filling and painting of the hull. After filling some dents yesterday afternoon todaynI did paint the hull for the third time.
To be honest yesterdays filling did not give the expected results. This became obvious after the painting. The semi-gloss white paint shows any imperfection.
The filling did remove some imperfections but also added others......
I will leave it this way. If I have the courage I will sand the hull again next spring but now I want to turn the hull to finalize the interior. When the boat is in the water only the fish will see.
Between filling, sanding and painting I had enough time to prepare the garden for the winter and tomorrow I will bring my motorboat to its winter storage.
It is now really end-of-season. The harbor next to my cottage is almost empty now and there are no boats on the water anymore . Expected temperature tomorrow around 10 degr C.
This is the first blog entry without pictures but another picture showing a painted hull would not excite anyone.
Last weekend we went up North to work on the hull of the Peapod and some more tasks around the cottage.
First of course a good sanding of the epoxied hull. Followed by protecting the sheerstrake with masking tape and paper.
 After the first coat of off-white poly urethane paint several uneven spots on the hull became apparent that were hardly noticable with the clear epoxy coat.
As I had the epoxy filler paste back home I just applied the second coat and afterwards removed the masking tape.
At one spot the masking tape had not been applied correctly apparently as there were some paint spots on the sheerstrake.
Next time I will apply some filler paste on the questionable spots before putting on one or two more coats of paint.
Als still some patience before the Pakesizzer will make its first trip.
After the first coat of off-white poly urethane paint several uneven spots on the hull became apparent that were hardly noticable with the clear epoxy coat.
As I had the epoxy filler paste back home I just applied the second coat and afterwards removed the masking tape.
At one spot the masking tape had not been applied correctly apparently as there were some paint spots on the sheerstrake.
Next time I will apply some filler paste on the questionable spots before putting on one or two more coats of paint.
Als still some patience before the Pakesizzer will make its first trip.
The last 2 days up North I gave the sheerstrake three layers of PU varnish. I will not post a photo of the finished sheerstrake because it doesn't differ much from all the previous pictures of the sheerstrake.
Between the layers there was 21 hours to do other things like eating, sleeping, gardening and visiting my regular supplier "De Bootbouwer" www.bootbouwer.nl .
This chandlery is interestingly enough situated in farming country, quite a distance from serious water.
I went there to buy a pair of oars. My initial plan was to build the oars myself but the price of these Finnish built oars was competitive enough to change my mind.
There was only one problem, the diameter of the oars is 45 mm while the folding rowlocks I bought a few months ago can accept a max of 40 mm.
Luckily I had bought these folding rowlocks also at De Bootbouwer so I could trade them for a set of "crutches" and sockets. I also acquired a tufnol sheave for the halyard.
 Finally I bought some length of half-round strip to protect keel.
Still to buy is the rudder gear. I investigated a few possiblitie s but I am not sure yet what to buy.
That will be decided in a later stage.
Next time I can go up North I will paint the rest of the hull. Again three coats so at least 2 1/2 days. No shortcut possible.
Finally I bought some length of half-round strip to protect keel.
Still to buy is the rudder gear. I investigated a few possiblitie s but I am not sure yet what to buy.
That will be decided in a later stage.
Next time I can go up North I will paint the rest of the hull. Again three coats so at least 2 1/2 days. No shortcut possible.
The last weeks nothing much was done on the Peapod but completing the varnishing of the rudder, tiller and dagger board. Furthermore the daggerboard stop was finalized and epoxied.
At last I will go up North later today to start varnishing the outside of the hull.
My aim is to get three layers of clear varnish on the sheerstrake. As I have to drive back somewhere Thursday morning I will have to cut the curing time per layer from 24 hours to 21 hours. Hopefully that is within the margins of the process parameters.
I also plan to go to one of my suppliers up North for oars and rudder hardware.
Next blog entry planned for Thursday or Friday.
The last week I have been varnishing the tiller, rudder and daggerboard.
Bit difficult to see on the picture with all light coming through the windows of my workshop at our new home.
I first lightly sanded tiller and rudder and clamped them in my two bench vices.
The tiller could be clamped at the part that goes into the rudder so I could varnish the whole tiller in one process. The rudder I first clamped at the cheeks so I could varnish the rudder blade.
After that two layers of high-gloss PU and one layer of satin gloss PU were applied. Each layer with 24 hours of curing time.
Now I have clamped the rudder blade as to varnish the cheeks and I also clamped the daggerboard at the handle as to varnish the board itself.
The first layer of high-gloss is now on so two more days to finish rudder and thereafter three days to finalize the grip of the daggerboard.
After finishing the rudder I will also start with the daggerboard cap that I made.
Finalizing a boat can be a long term process. I still have to find time to go up North to start varnishing and paint the outside of the hull. My objective is still to row the Peapod before the end of the season. That implies a total bulding time of one year. Longer than anticipated, but moving house twice and partly building on two locations did not help.
The mast, boom and gaff will be done this winter and in december I will go to a sailmaking course at the Bootbouwschool to make my own sail.
Two days in ourt cottage up North. The garden needed quite some attention.
Luckily I was able to lightly sand (240 grit) the seats and coated the seats with two layers of high-gloss PU varnish.
There was not sufficient (process) time left to add the final coat of satin PU varnish.
Despite that we turned the hull. Now I can go up North and sand, varnish and paint the outside of the hull without any help. That last layer on the seats can be done in a later stage.
 In between varnishing and mowing the lawn I made a dagger board case stopper out of scrap material.
It is a piece of red cedar for the dagger and mahogany as lid. Sculted and glued together. Now some more sanding and thereafter the well known epoxy + PU treatment. Also have to add a knob of some kind to get it out.
In between varnishing and mowing the lawn I made a dagger board case stopper out of scrap material.
It is a piece of red cedar for the dagger and mahogany as lid. Sculted and glued together. Now some more sanding and thereafter the well known epoxy + PU treatment. Also have to add a knob of some kind to get it out.
No major achievements on boatbuilding the last days.
Just sanded and impregnated the rudder, tiller and daggerboard and yesterday got the first epoxy layer on.
Today I have my weekly shift at de Middelste Molen, a local industrial heritage site www.demiddelstemolen.nl
Later today we go up North for the weekend so I can continue painting the hull of the Peapod.
After laminating the tiller first one of the cheeks has to be glued to the rudder. This "half assy" will be the mold for cutting the tennon that will fitt between the rudder cheeks.
Before that the inside of the tiller hole has to be coated in epoxy.
Apparently I had made the laminations to thin or the hole between the cheeks to large with the same net effect that the tiller had a loose fit.
As a quick and dirty remedy I glued one short laminate on top of the tiller. Later after sculpting the tiller it will be less noticable.
 Now I could cut the tiler tenon for a snug fit and glue on the other cheek.
You will have noticed that I still have to cut the foil shape for the rudder blade. Also the tiller itself is in need of some TLC.
I checked with Arch Davis whether the snug fit of the tiller in the rudder would be enough.
Quickly as ever he responded that it would be sufficient and any case the lines that raise and lower the rudder blade will keep the tiller in
place.
Now I had decided in my ultimate wisdom to make a fixed rudder....
Now I could cut the tiler tenon for a snug fit and glue on the other cheek.
You will have noticed that I still have to cut the foil shape for the rudder blade. Also the tiller itself is in need of some TLC.
I checked with Arch Davis whether the snug fit of the tiller in the rudder would be enough.
Quickly as ever he responded that it would be sufficient and any case the lines that raise and lower the rudder blade will keep the tiller in
place.
Now I had decided in my ultimate wisdom to make a fixed rudder....
Yesterday back home I have ripped a piece of red cedar in 6mm thick, 50 mm wide strips.
Together with some mahogany strips left over from a previous project this is just enough wood to laminate the tiller.
The mold was made out of an old piece of solid wood and the form taken from the full size pattern drawing from Arch.
Although the outside temperature may reach an all time hightoday I foolishly decided to glue the lamination. Sorry for the bad picture but the camera and myself almost melted...
So tomorrow we will see how good the epoxy has cured under these environmental conditions.
I went op North for 2 days to mowe the lawn and work on the boat.
The bungs in the seats were removed, the seats lightly sanded and a layer of epoxy applied.
After a few hours when the epoxy was still sticky I did put on the next layer. Now the epoxy has to cure for at least 48 hours before I can sand it again and the polyurethane varnish van be applied. Work for the next trip.
There was a small quantity of the white polyurethane paint left so I decided to paint already the top of the stems. That is a place a bit difficult to get at when the boat has been turned.
As there was no workable work on the hull I continued with the rudder.
 I smoothed the top of the rudder stock and screwed on both rough cut cheeks. Those cheeks are made out of remaining pieces of mahogany. A bit heavy but I hope it looks better than the plywood Arch David is using. The rudder was then put on the router table to machine the cheeks to the right shape of the rudder stock.
As I don't know when I can go up North again I packed the rudder parts, wood for tiller and thwart knees, some tools and an epoxy kit in the car. I can continue to work on these parts at home.
I smoothed the top of the rudder stock and screwed on both rough cut cheeks. Those cheeks are made out of remaining pieces of mahogany. A bit heavy but I hope it looks better than the plywood Arch David is using. The rudder was then put on the router table to machine the cheeks to the right shape of the rudder stock.
As I don't know when I can go up North again I packed the rudder parts, wood for tiller and thwart knees, some tools and an epoxy kit in the car. I can continue to work on these parts at home.
This morning I did put in the flotation foam.
To avoid the white foam to be visible between the planks of the aft seat I did paint dark stripes on the foam.
 The middle, side and aft seats were screwed to the seat beams and the screw holes bunged.
While preparing the foam for the front seat I noticed that I had forgotten to cut the mast hole in the flotation bottom.....
The middle, side and aft seats were screwed to the seat beams and the screw holes bunged.
While preparing the foam for the front seat I noticed that I had forgotten to cut the mast hole in the flotation bottom.....
 The flotation is not yet ready as I still have to cut out room for the mast support below the seat.
The second coat of high-gloss was put on. Tomorrow I will put on the final coat of satin-gloss.
Thereafter the seats still have to be coated but that will not be done this week.
The flotation is not yet ready as I still have to cut out room for the mast support below the seat.
The second coat of high-gloss was put on. Tomorrow I will put on the final coat of satin-gloss.
Thereafter the seats still have to be coated but that will not be done this week.
This morning we went up to the North again for a couple of days to relax, some gardening and to work on the Peapod.
Yesterday night I woke up with the thought that I had made no draining holes in the flotation bottoms. So first thing to do was drilling some holes and put epoxy on the hole edges and also on the rest of the bottoms.
Next step was some fine sanding of the epoxy parts to be varnished.
The varnish I use is polyurethane two component high-gloss. Luckily I noticed in time that this varnish is mixed 1 : 3 in stead of the 1 : 2 of all other stuff.
I will apply two coats of the high-gloss and after that one coat of satin-gloss.
 After mixing the magic potion again has to pre-react for 30 minutes. Good thing because it enabled me to watch the finish of the Laser Radial final on London 2012 and see a Dutchwoman win silver!
Applying the first layer went quite smooth. Because of the sanding you can see were you have to put on the varnish. The second layer can be applied after between 24 and 48 hours without sanding so that one will be more tricky.
Now 24 hours time before the next layer. Maybe I will put in the flotation when the varnish is not sticky anymore. I will need some parallel processing to reduce throughput time :-)
After mixing the magic potion again has to pre-react for 30 minutes. Good thing because it enabled me to watch the finish of the Laser Radial final on London 2012 and see a Dutchwoman win silver!
Applying the first layer went quite smooth. Because of the sanding you can see were you have to put on the varnish. The second layer can be applied after between 24 and 48 hours without sanding so that one will be more tricky.
Now 24 hours time before the next layer. Maybe I will put in the flotation when the varnish is not sticky anymore. I will need some parallel processing to reduce throughput time :-)
Today I went up to the North for one day to get some stuff for the new house and to do some work on the boat.
I did make the bottom pieces for the flotation chambers from 3 mm normal ply. Not the marine version. Do not think that is necessary.
After quite some adjusting they did fit reasonably well. You cannot get a very tight fit because you would not be able to get them in. At least I couldn't.
 The flotation bottoms are not in Arch' drawings. While cutting the first piece of styrofoam I had noticed it was rather crumbly stuff. Also one of the Followers of this blog mailed me his experience with styrofoam flotaton material in Optimist sailing dinghies. So making the bottoms would be a solution.
I epoxied both sides of the bottoms. That should be sufficient but maybe I wil add another layer to be on the safe side.
Further plan was to sand the inside parts to be varnished like the sheerstrake and the seat beams. However it was relatively hot outside and the sun was sorcing the black roof of the shed so the working conditions were not good at all and I decided to call it a day and drive the 90 minutes back to the new house and take a nice bottle of chilled white wine with the missus.
Don't know when I am able to continue working on the Peapod.
The flotation bottoms are not in Arch' drawings. While cutting the first piece of styrofoam I had noticed it was rather crumbly stuff. Also one of the Followers of this blog mailed me his experience with styrofoam flotaton material in Optimist sailing dinghies. So making the bottoms would be a solution.
I epoxied both sides of the bottoms. That should be sufficient but maybe I wil add another layer to be on the safe side.
Further plan was to sand the inside parts to be varnished like the sheerstrake and the seat beams. However it was relatively hot outside and the sun was sorcing the black roof of the shed so the working conditions were not good at all and I decided to call it a day and drive the 90 minutes back to the new house and take a nice bottle of chilled white wine with the missus.
Don't know when I am able to continue working on the Peapod.
There is quite some wind blowing what causes little leafs to come in the shed and fall on my (not so very) beautiful paint job.
The correct corrective action is of course closing all holes with foam or some other substance.
The easier way that I used is to put up two garden umbrellas. It is too lousy weather to put them up outside anyway.
Now I put the second layer of polyurethane on. Looks already a bit better.
As I am running ut of the white stuff I closed the shop for this week
Next time I want to make the flotation bottoms and to put three layers of clear polyurethane varnish on the sheerstrake and seat beams.
Back at my shed for 3 days. Of course first the grass had to be cut.
 After that I did sand the inside of the boat that I wanted to paint. I decided that the sheerstrake, seat beams and daggerboard case would be varnished.
For both I use Polyservice DD lak. This is a polyurethane 2-components lacquer.
The painting part is done in off-white. After mixing the components it has to stay for 30 minutes. Almost like baking bread.
After that I did sand the inside of the boat that I wanted to paint. I decided that the sheerstrake, seat beams and daggerboard case would be varnished.
For both I use Polyservice DD lak. This is a polyurethane 2-components lacquer.
The painting part is done in off-white. After mixing the components it has to stay for 30 minutes. Almost like baking bread.
 I did the painting with a brush to be able to get at the difficult parts around the stems.
It is a bit back breaking excercise to get to the bottom of the boat.
Of course I had only mixed enough paint for 90 % of the job so remixing and 30 minutes waiting.......
I am not very satisfied with the results. It was difficult to get a good even spread of the thin paint and later I found the paint was "sacking" (combination of too much paint and gravity) at several spots what could not be corrected as the paint was already drying. Surely the outside will be done with a paint roller.
Tomorrow the second layer and next week maybe a third one. Wait and see.
I had planned to cut the ply "bottoms" for the flotation but found out I had left my jig saw at the new house. So enough time to do other things.
I did the painting with a brush to be able to get at the difficult parts around the stems.
It is a bit back breaking excercise to get to the bottom of the boat.
Of course I had only mixed enough paint for 90 % of the job so remixing and 30 minutes waiting.......
I am not very satisfied with the results. It was difficult to get a good even spread of the thin paint and later I found the paint was "sacking" (combination of too much paint and gravity) at several spots what could not be corrected as the paint was already drying. Surely the outside will be done with a paint roller.
Tomorrow the second layer and next week maybe a third one. Wait and see.
I had planned to cut the ply "bottoms" for the flotation but found out I had left my jig saw at the new house. So enough time to do other things.
Arrived back in the North Monday afternoon. Applied two layers of pure epoxy almost wet-on-wet or better formulated wet-on-sticky. Now these layers have to cure for 48 hours before fine (200+) sanding and putting on the paint or varnish.
 The seats also have to get at least a double layer of clear epoxy on the underside.
The top side will be done when the seats are screwed in and the screwholes are bunged.
Of course I have not been careful enough with epoxy so some dripping due to gravity to the other side of he seat. Nothing some scraping and sanding won't solve but extra work.
The seats also have to get at least a double layer of clear epoxy on the underside.
The top side will be done when the seats are screwed in and the screwholes are bunged.
Of course I have not been careful enough with epoxy so some dripping due to gravity to the other side of he seat. Nothing some scraping and sanding won't solve but extra work.
 I made some of the flotation from styrofoam insulation plates.
As this styrofoam is a bit brittle I don't like the exposed undersides. The styrofoam is just supported by cleats on the seat beams.
Maybe I will put a thin plywood underneath.
Of course more sealing of seat parts to do but I ran out of a good brush and mohair roller.
When doing a second layer " wet-on-sticky" it is quite difficult to see where you have been. Maybe it is therefore better to let it dry subsequently sand lightly to make it more visible.
I made some of the flotation from styrofoam insulation plates.
As this styrofoam is a bit brittle I don't like the exposed undersides. The styrofoam is just supported by cleats on the seat beams.
Maybe I will put a thin plywood underneath.
Of course more sealing of seat parts to do but I ran out of a good brush and mohair roller.
When doing a second layer " wet-on-sticky" it is quite difficult to see where you have been. Maybe it is therefore better to let it dry subsequently sand lightly to make it more visible.
This morning I put the flotation cleats in using screws. I did not glue them in as that is not necessary and with all those thin cleats can easily turn out in an epoxy mess.
I found out I was one cleat short. After some searching I found it laying on my workbench. As it was not yet in the impregnating epoxy I put that on and will screw it on just before I leave after lunch.
My shed is very hot inside. Black exterior walls and a black roof combined with sun makes it a great oven.
Continued next week.
My youngest daughter could pick up the epoxy, varnish and paint in Amsterdam so I am hopefully stocked for a few layers. I am not sure I have enough because I don't really know how much I will use :-)
 Last Friday we got the key for our new home so we went there for the weekend to start familarization. Now a few days back in the North for other things like boatbuilding.
I finalized the seats, sanded the inside of the boat and put on the first layer epoxy. Also the flotation cleats were epoxied.
Tomorrow morning I will put in the flotation cleats with screw and maybe give part of the seats their first coat of epoxy.
Tomorrow afternoon I am going back to the new house.
Perhaps coming Tuesday progress again. Plan is to put two additional layers of epoxy on the inside. The second layer can be applied when the the first is "sticky".
Next steps will be futher coating of the seats and cutting the flotation devices out of styrofoam.
When all epoxy is done it is time to put the paint and varnish inside.
Last Friday we got the key for our new home so we went there for the weekend to start familarization. Now a few days back in the North for other things like boatbuilding.
I finalized the seats, sanded the inside of the boat and put on the first layer epoxy. Also the flotation cleats were epoxied.
Tomorrow morning I will put in the flotation cleats with screw and maybe give part of the seats their first coat of epoxy.
Tomorrow afternoon I am going back to the new house.
Perhaps coming Tuesday progress again. Plan is to put two additional layers of epoxy on the inside. The second layer can be applied when the the first is "sticky".
Next steps will be futher coating of the seats and cutting the flotation devices out of styrofoam.
When all epoxy is done it is time to put the paint and varnish inside.
First I wanted to smoothen the mahogany edgings of the thwart with a plane. As my planes were getting dull I first sharpened them on a waterstone.
I have a honing guide to get the right angle when sharpening. The length out of the honing guide determines the angle of the blade.
To simplify the measurement process I made a jig with the right lengths for 25 and 30 degrees,. Easy does it.
After the smoothening I made a soft edge at one side on the router table. As I had not yet bunged the holes for the positioning screws in the mahogany the router wheel went through the hole making a slight dent in the edging. Not very clever. The bungs will be made later but first I wanted to use the thwart to measure the position of the side seats and screw them to the seat beams.
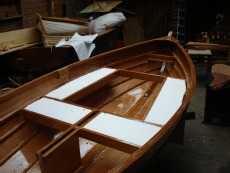
 Making the aft seat was relatively easy. Nice to see the effect of of having the seats in.
Next step is everything out again and rounding the edges with the router. Also the screw holes are bored with a 8 mm bit to be able to bung the holes in a later stage.
The seats wil not be glued to the beams but only screwed.
Now it is time for bunging the mahogany edgings.
First I made 8 mm holes in a role masking tape on the drillpress. Nice trick I learned from a book. Now you don't smear the wood with epoxy while bunging.
I used red cedar for bungs. They are a little more flexible than mahogany bungs and give a nice detail hopefully.
Finally I did put epoxy primer on the backsides of the side and aft seats. I am running a bit low on epoxy and primer so I have to buy some extra stuff. Also a good moment to buy the paint for the outside of the hull. My plan is to use white. The only problem is that my epoxy supplier is almost 2 hours driving. Maybe I can ask someone to pick it up for me.
Don't have a program yet for tomorrow but I think I will round the front seat and also prime the backsides.
Making the aft seat was relatively easy. Nice to see the effect of of having the seats in.
Next step is everything out again and rounding the edges with the router. Also the screw holes are bored with a 8 mm bit to be able to bung the holes in a later stage.
The seats wil not be glued to the beams but only screwed.
Now it is time for bunging the mahogany edgings.
First I made 8 mm holes in a role masking tape on the drillpress. Nice trick I learned from a book. Now you don't smear the wood with epoxy while bunging.
I used red cedar for bungs. They are a little more flexible than mahogany bungs and give a nice detail hopefully.
Finally I did put epoxy primer on the backsides of the side and aft seats. I am running a bit low on epoxy and primer so I have to buy some extra stuff. Also a good moment to buy the paint for the outside of the hull. My plan is to use white. The only problem is that my epoxy supplier is almost 2 hours driving. Maybe I can ask someone to pick it up for me.
Don't have a program yet for tomorrow but I think I will round the front seat and also prime the backsides.
I tried to contact my local supplier for some more Red Cedar. Alas, he is on holidays.
Monday I am close to Arnhem and will make a stop at my favorite wood supplier for the wood.
The inner two planks of the front seat were not to my liking. The gaps between the planks were too wide so I re did them. Just enough wood left.
After some finetuning I made a dry fit with screws to the seat beams, the mast partner and a floating beam to keep everything together.
 Also from another perspective not bad at all! The hole in the seat and mast partner already cut to size.
 Next step was using the router table to make a nice round edge on the seat.
My plan is to screw the seat planks and not glue them to the beams.
The screw head will be covered by bungs so I used my drill press to make nice 8 mm holes for the bungs.
Curved sides of the planks is a nice detail.
The coming days there will not be much work done on the boat due to other activities. So I hope on Tuesday I have the wood for the thwart so I can continue.
Next step was using the router table to make a nice round edge on the seat.
My plan is to screw the seat planks and not glue them to the beams.
The screw head will be covered by bungs so I used my drill press to make nice 8 mm holes for the bungs.
Curved sides of the planks is a nice detail.
The coming days there will not be much work done on the boat due to other activities. So I hope on Tuesday I have the wood for the thwart so I can continue.


 In the last weeks I did not sit idle because I have made a gardenbench for my youngest daughter who gets a new house at the end of the month.


.jpg)
.jpg)


